
谷粒商城-高级-57 -商城业务-认证服务-环境搭建
一、创建认证微服务
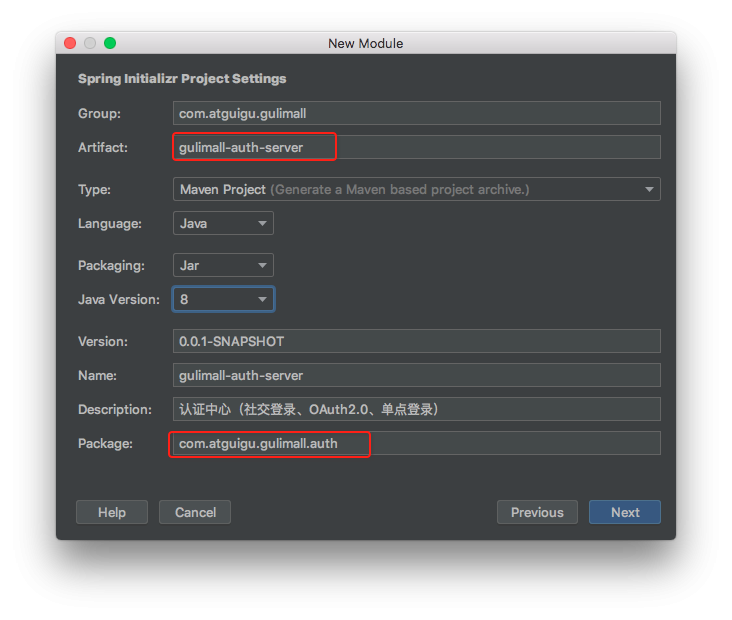
在我们当前项目,创建一个用于认证的微服务: gulimall-auth-server
选择依赖包: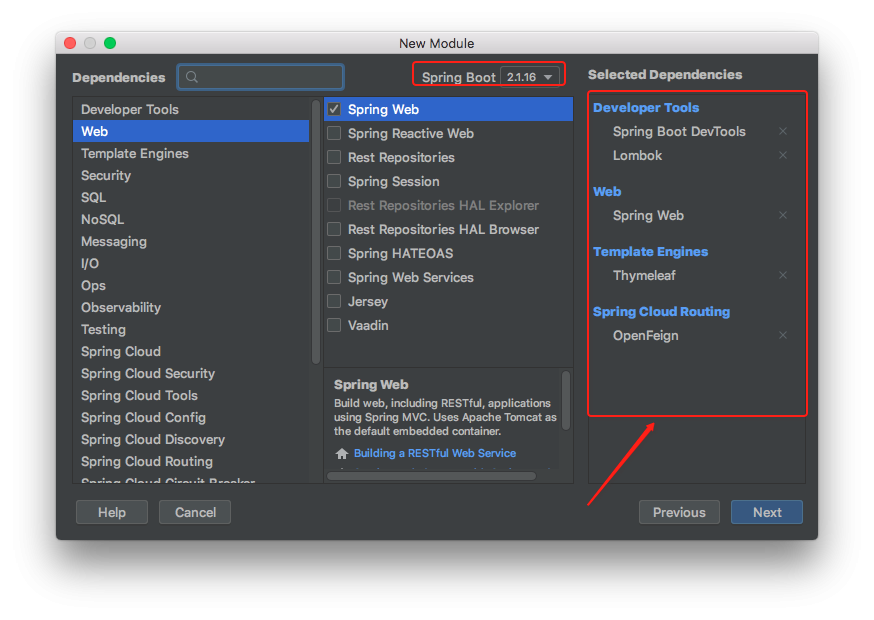
二、初始化配置
1、导入通用服务
创建好微服务后,导入 gulimall-common 通用依赖包,因为我们这个微服务不涉及到数据库的操作,所以,在导入通用包的时候,需要将数据库依赖排除掉。
gulimall-auth-server/pom.xml
     <dependency>
      <groupId>com.atguigu.gulimall</groupId>
      <artifactId>gulimall-common</artifactId>
      <version>0.0.1-SNAPSHOT</version>
      <!-- 排除掉数据库依赖-->
      <exclusions>
        <exclusion>
          <groupId>com.baomidou</groupId>
          <artifactId>mybatis-plus-boot-starter</artifactId>
        </exclusion>
      </exclusions>
    </dependency>
2、配置注册中心
创建 gulimall-auth-server/src/main/resources/application.yml
spring:
  #  配置nacos注册中心
  cloud:
    nacos:
      discovery:
        server-addr: 127.0.0.1:8848
  application:
    name: gulimall-auth-server
server:
port: 20000启动类添加注册发现和远程调用功能:com/atguigu/gulimall/auth/GulimallAuthServerApplication.java
package com.atguigu.gulimall.auth;

import org.springframework.boot.SpringApplication;
import org.springframework.boot.autoconfigure.SpringBootApplication;
import org.springframework.cloud.client.discovery.EnableDiscoveryClient;
import org.springframework.cloud.openfeign.EnableFeignClients;

@EnableFeignClients  // 开启远程调用
@EnableDiscoveryClient // 开启注册发现功能
@SpringBootApplication
public class GulimallAuthServerApplication {

  public static void main(String[] args) {
    SpringApplication.run(GulimallAuthServerApplication.class, args);
  }
}
启动服务,然后就可以在Nacos配置中心看到该认证服务已经注册上了: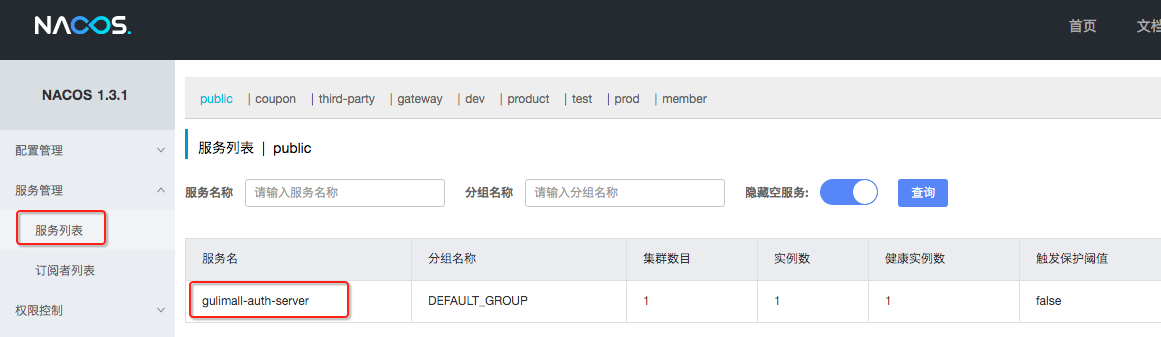
有关Nacos配置的回顾:
使用Nacos Config做统一配置管理时,启动springboot项目初始化都是使用 bootstrap.properties 配置文件去初始化上下文。使用SpringCloudConfig这种统一配置时Spring Boot 配置文件的加载顺序,依次为 bootstrap.properties -> bootstrap.yml ->application.properties -> application.yml,其中 bootstrap.properties配置为最高优先级。
三、引入静态资源
1、导入页面
导入注册和登录页面到 src/main/resources/templates/ 目录下: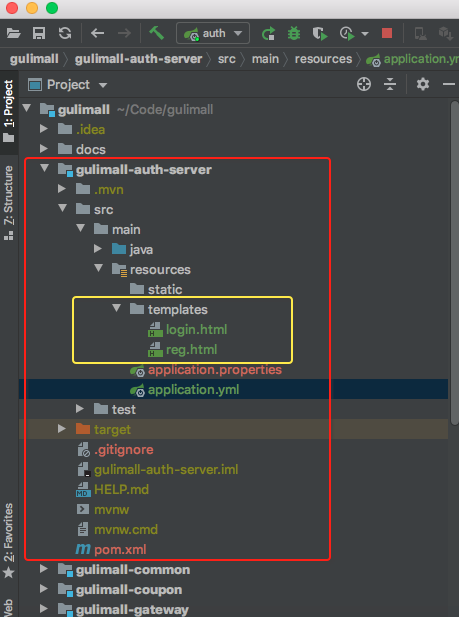
2、导入静态资源
导入注册页面和登录页面的css,js,imgs等静态资源到Nginx服务器路径下,因为我们的页面是动静分离的,所以,静态资源放在了Nginx服务器下。
Nginx 服务器下静态资源路径: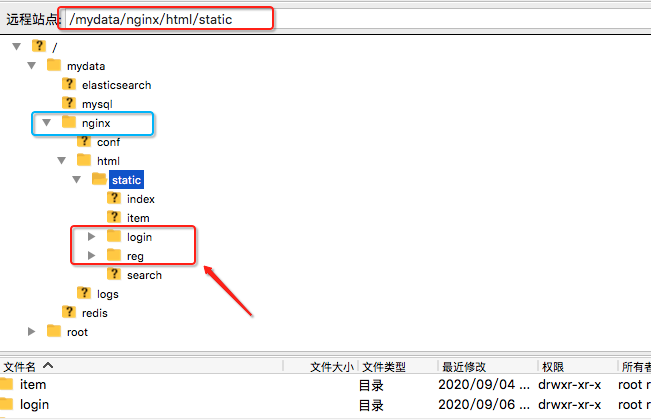
导入之后,然后将注册、登录页面的引入路径替换为Nginx下的访问路径:
注册页:
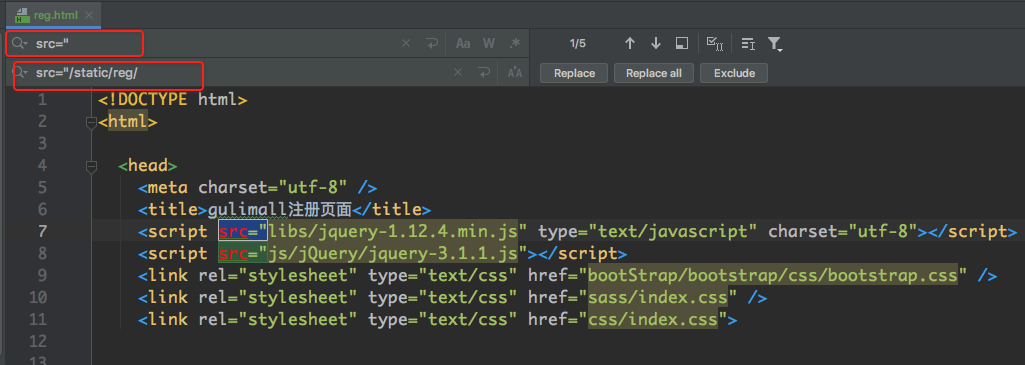
src="js/jQuery/jquery-3.1.1.js"   // 旧的引入路径
src="/static/reg/js/jQuery/jquery-3.1.1.js"   // 新的引入路径
3、编排微服务域名
修改域名地址 /etc/hosts, 添加认证服务域名
#gulimall
192.168.10.10 gulimall.com
192.168.10.10 search.gulimall.com
192.168.10.10 item.gulimall.com
192.168.10.10 auth.gulimall.com   # 认证服务
4、配置网关服务
gulimall-gateway/src/main/resources/application.yml
spring:
  cloud:
    gateway:
      routes:
        - id: product_route
          uri: lb://gulimall-product
          predicates:
            - Path=/api/product/**
          filters:
            - RewritePath=/api/(?<segment>.*),/$\{segment}

        - id: third_party_route
          uri: lb://gulimall-third-party
          predicates:
            - Path=/api/thirdparty/**
          filters:
            - RewritePath=/api/(?<segment>.*),/$\{segment}

        - id: member_route
          uri: lb://gulimall-member
          predicates:
            - Path=/api/member/**
          filters:
            - RewritePath=/api/(?<segment>.*),/$\{segment}

        - id: ware_route
          uri: lb://gulimall-ware
          predicates:
            - Path=/api/ware/**
          filters:
            - RewritePath=/api/(?<segment>.*),/$\{segment}

        - id: admin_route
          uri: lb://renren-fast
          predicates:
            - Path=/api/**
          filters:
            - RewritePath=/api/(?<segment>.*),/renren-fast/$\{segment}

        - id: gulimall_host_route
          uri: lb://gulimall-product
          predicates:
            - Host=gulimall.com,item.gulimall.com

        - id: gulimall_search_route
          uri: lb://gulimall-search
          predicates:
            - Host=search.gulimall.com

                # 配置认证网关[20200906]
        - id: gulimall_auth_route
          uri: lb://gulimall-auth-server
          predicates:
            - Host=auth.gulimall.com

## 前端项定义规则,都带 /api 前缀, lb 表示负载均衡到哪个注册器
## http://localhost:8888/api/captcha.jpg  需要通过注册中心网关8888端口转发到renren-fast 8080端口服务
## http://localhost:8080/renren-fast/captcha.jpg:
## filters 路径重写 /api/ -> /renren-fast/
四、创建控制器
创建控制器,并访问注册页面。
com/atguigu/gulimall/auth/LoginController.java
package com.atguigu.gulimall.auth;

import org.springframework.stereotype.Controller;
import org.springframework.web.bind.annotation.GetMapping;

/**
 * @author: kaiyi
 * @create: 2020-09-06 13:41
 */
@Controller
public class LoginController {

  @GetMapping("/login.html")
  public String loginPage(){
    return "login";
  }

  @GetMapping("reg.html")
  public String regPage(){
    return "reg";
  }
}
启动服务,然后访问:
http://auth.gulimall.com/reg.html
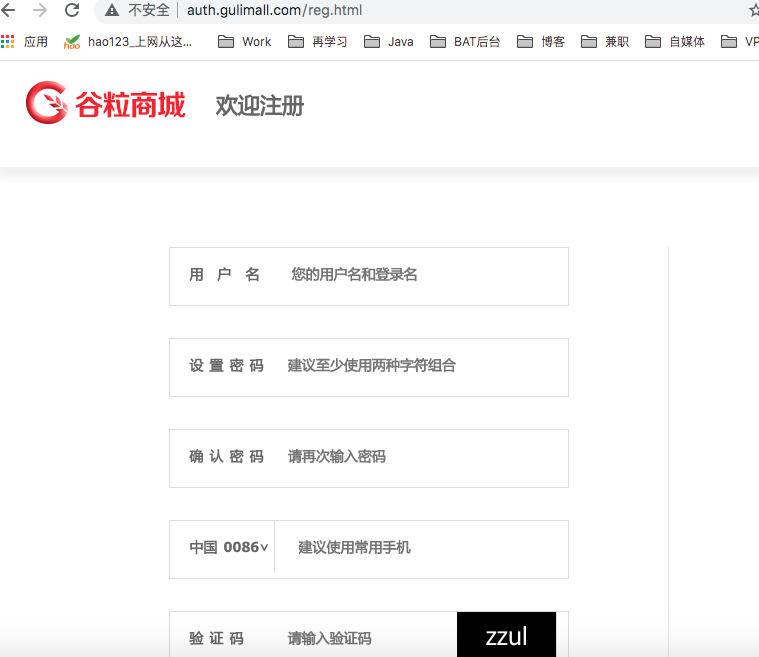
可以看到,我们的认证环境服务已经搭建成功了。
五、视图映射
可以看到上边的登录和注册控制器方法没有传递任何参数,只是一个简单的跳转,使我们代码不够简洁,springMVC 提供了 viewController 方法,将请求和页面映射过来,不用再写很多空方法了,简化了我们的Controller。
创建视图配置映射:com/atguigu/gulimall/auth/config/GulimallWebConfig.java
package com.atguigu.gulimall.auth.config;

import org.springframework.context.annotation.Configuration;
import org.springframework.web.servlet.config.annotation.ViewControllerRegistry;
import org.springframework.web.servlet.config.annotation.WebMvcConfigurer;

/**
 * @author: kaiyi
 * @create: 2020-09-06 15:00
 */
@Configuration
public class GulimallWebConfig implements WebMvcConfigurer {

  /**
   * 视图映射
   *
   * @param registry
   */
  @Override
  public void addViewControllers(ViewControllerRegistry registry) {

    /**
     * 等价于:
     *
     *  @GetMapping("/login.html")
     *   public String loginPage(){
     *     return "login";
     *   }
     */
    registry.addViewController("/login.html").setViewName("login");
    registry.addViewController("/reg.html").setViewName("reg");

  }
}注释掉控制器里边的方法:com/atguigu/gulimall/auth/controller/LoginController.java
package com.atguigu.gulimall.auth.controller;

import org.springframework.stereotype.Controller;
import org.springframework.web.bind.annotation.GetMapping;

/**
 * @author: kaiyi
 * @create: 2020-09-06 13:41
 */
@Controller
public class LoginController {

  /**
   * 发送一个请求直接跳转到一个页面。
   *
   * springMVC viewController:将请求和页面映射过来,好处:不用再写很多空方法了,无需再写Controller方法了。
   */

  /**
  @GetMapping("/login.html")
  public String loginPage(){
    return "login";
  }

  @GetMapping("reg.html")
  public String regPage(){
    return "reg";
  }
  */
}
然后重启服务,通过视图映射也可以访问到注册、登录页面。
为者常成,行者常至
自由转载-非商用-非衍生-保持署名(创意共享3.0许可证)


